
There are various articles & videos available on the web explaining a lot on Why should one get started with Kubernetes and How to do it?
Well, We are not covering the Why part in this blog but we are certainly covering the How part here.
To give you a background, we wanted our own setup of JIRA. I’ve been running that locally on my docker container but I thought why don’t we deploy that onto Kubernetes. Specifically, we are going to use Google Kubernetes Engine.
So to give you an overview of the tasks that we are going to carry out is as below.
- Setup Gcloud Console on my laptop
- Installing kubectl
- Setting up Environment Variables for Gcloud
- Running Kubernetes Cluster from UI
- Pushing my JIRA container from the local registry to Google Container Registry
- Configure and Start Kubernetes Cluster
- Deploying the Workload of JIRA into Kubernetes Cluster
Disclaimer: This practical approach is to understand how can you publish your existing containers in Kubernetes cluster. Please do not use this tutorial to launch your JIRA instance for production. Since we are using in-memory DB it’s not going to be persistent storage and in this tutorial, we are launching this application with only 1 replica which doesn’t represent the purpose of using Kubernetes, to begin with. So use this tutorial as a reference to having your application moved into Kubernetes.
Setting up Gcloud Console
There are easy tutorials available to download and set up Gcloud console which is for MAC is just by installing a binary. You can see it here
Installing kubectl
In order to manage your Kubernetes cluster from your own console, you need to have kubectl installed on your machine.
Follow the instructions below to set up the same.
$ gcloud components install kubectl

Your current Cloud SDK version is: 246.0.0
Installing components from version: 246.0.0

┌─────────────────────────────────────────────────────────────────────┐
│                 These components will be installed.                 │
├─────────────────────┬────────────────────────┬──────────────────────┤
│         Name        │        Version         │         Size         │
├─────────────────────┼────────────────────────┼──────────────────────┤
│ kubectl             │             2019.05.10 │              < 1 MiB │
│ kubectl             │                 1.11.9 │             65.3 MiB │
└─────────────────────┴────────────────────────┴──────────────────────┘

For the latest full release notes, please visit:
  https://cloud.google.com/sdk/release_notes

Do you want to continue (Y/n)?  y

╔════════════════════════════════════════════════════════════╗
╠═ Creating update staging area                             ═╣
╠════════════════════════════════════════════════════════════╣
╠═ Installing: kubectl                                      ═╣
╠════════════════════════════════════════════════════════════╣
╠═ Installing: kubectl                                      ═╣
╠════════════════════════════════════════════════════════════╣
╠═ Creating backup and activating new installation          ═╣
╚════════════════════════════════════════════════════════════╝

Performing post processing steps...done.

Update done!

WARNING:   There are older versions of Google Cloud Platform tools on your system PATH.
  Please remove the following to avoid accidentally invoking these old tools:

  /Applications/Docker.app/Contents/Resources/bin/kubectl
Login & setup environment variables for Gcloud
Once the kubectl is ready, you need to log in to your Gcloud console from CLI and then configure the default region and configure your project-id.
$ gcloud auth login
Your browser has been opened to visit:

    https://accounts.google.com/o/oauth2/auth?redirect_uri=http%3A%2F%2Flocalhost%3A8085%2F&prompt=select_account&response_type=code&client_id=XXXXXXXX.apps.googleusercontent.com&scope=https%3A%2F%2Fwww.googleapis.com%2Fauth%2Fuserinfo.email+https%3A%2F%2Fwww.googleapis.com%2Fauth%2Fcloud-platform+https%3A%2F%2Fwww.googleapis.com%2Fauth%2Fappengine.admin+https%3A%2F%2Fwww.googleapis.com%2Fauth%2Fcompute+https%3A%2F%2Fwww.googleapis.com%2Fauth%2Faccounts.reauth&access_type=offline

WARNING: `gcloud auth login` no longer writes application default credentials.
If you need to use ADC, see:
  gcloud auth application-default --help

You are now logged in as [XXXXXXXXXXXXXXXX].
Your current project is [XXXXXXX-241104].  You can change this setting by running:
  $ gcloud config set project PROJECT_ID
Use the below command to set the default project-id and compute/zone.
$ gcloud config set project <<Project-ID>
Updated property [core/project].
$ gcloud config set compute/zone us-central1-a
Updated property [compute/zone].
Tagging Docker Image to Google Cloud Repo
The next thing we need to do is moving our Docker image (which in the current scenario, I have on my local docker host) into the Google Container registry.
First, we would have to tag our current image to GCR.
$ docker images
REPOSITORY               TAG                 IMAGE ID            CREATED             SIZE
dchevell/Jira-software   latest              4d8d1ed72cb0        33 hours ago        594MB

$ docker tag dchevell/jira-software gcr.io/<<project-id>>/jira-software:v1
$ docker images
REPOSITORY                             TAG                 IMAGE ID            CREATED             SIZE
dchevell/jira-software                 latest              4d8d1ed72cb0        33 hours ago        594MB
gcr.io/<<project-id>>/jira-software   v1                  4d8d1ed72cb0        33 hours ago        594MB
Now we need to push the image to GCR.
$ gcloud docker -- push gcr.io/<<project-id>>/jira-software:v1
Starting Kubernetes Cluster in Google Cloud.
First Go-to Google Cloud Console and go to Kubernetes Engine –> Clusters and click on create cluster

Then provide a definition to your Kubernetes Cluster.

Provide the Following input:
- Name: Give your Kubernetes Cluster a meaningful name
- Zone: Select a zone in which you wanted your cluster to be available.
- Number of Nodes: These are the number of nodes (actual Compute servers) that would be started as part of this cluster.
- Resources: Give input to No. of VCPUs and RAM which is required on each node of the cluster.
This would get your Kubernetes Cluster started in Google Cloud. There should be a green dot to represent that the Cluster is in healthy mode.
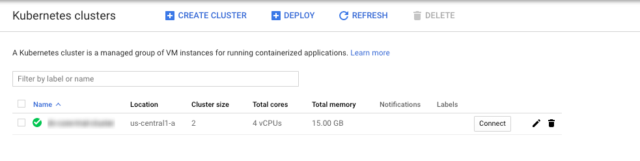
You can do the same thing using CLI as well but keeping it for our next blog. Let’s get you started with UI first. 🙂
Deploying Container image to Kubernetes Cluster
You can connect to the Google Cloud Shell from the top right corner which would allow you to connect directly to your Kubernetes cluster.
And then create the below file as the YAML file. Replace the image tag with your actual image id.
$ cat new-jira.yaml
---
apiVersion: "extensions/v1beta1"
kind: "Deployment"
metadata:
  name: "jira"
  namespace: "default"
  labels:
    app: "jira"
spec:
  replicas: 1
  selector:
    matchLabels:
      app: "jira"
  template:
    metadata:
      labels:
        app: "jira"
    spec:
      containers:
      - name: "jira-software-sha256"
        image: "<<GCR IMAGE ID>>"
Deploy the workload using kubectl command.
kubectl create -f new-jira.yaml
Also, we need to expose 8080 ports to allow users to access our application. Create the file and then use kubectl the command again to deploy the service in workload.
$ cat jira-service.yaml
apiVersion: v1
kind: Service
metadata:
  labels:
    app: jira
  name: jira
spec:
  ports:
    - port: 8080
      targetPort: 8080
  selector:
    app: jira
  type: LoadBalancer
kubectl create -f jira-service.yaml
Now, Go to Google Cloud Console and go to Kubernetes –> Workloads. You should see the Workload in running mode.
Disclaimer: I understand that creating only one replica doesn’t allow us to have any redundancy and fault tolerance here. Since I wanted to use in-memory DB of JIRA having multiple Replicas running would not work. And hence part of this article I’ve started workload only with 1 replica.
This concludes our lab. At the end of this lab, you should be able to run the Kubernetes cluster and deploy a workload(application) on the Kubernetes Cluster.
In case you are looking for a way to migrate your existing applications to Kubernetes, we at Datavizz help an enterprise to create an enterprise migration strategy to migrate your product to a Cloud-Native application stack.